|
Object Placement
To place an object, the Entity Layout has to be open on the screen.

There are three ways of accessing the Entity Layout.
Property Name
Enter the Property name for easy recall. This field is mandatory. The name specified here would be the name with which your layout is saved by default. If you leave this field blank, by default your layout will be saved as ‘New Property’.
From the Plot mode
You can double click on the Entity in question and the Entity mode screen will open up.
From the main Menu
You can select an Entity by clicking on it. Now go to View Menu > Entity mode to switch
from the Plot mode to the selected Entity mode.
From the Tool Bar
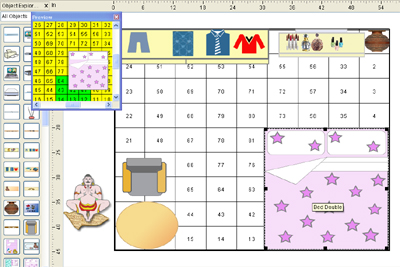
When the Entity Layout is displayed on the screen, you will see the Objects Explorer on the side of
the screen. The Objects have been categorized under different groups. You can choose to
display any particular group of objects or All Objects according to your preference.
Placing your cursor on the Object image in the Object Explorer will display the name of the Object
in question. Click on the Object that you wish to place. An Auspiciousness Indicator Window will come
up immediately indicating the auspiciousness levels and act as a guide for correct Vaastu placement of
the Object. Click on the Entity Layout and the Object will be placed there.
A selected Object can be moved around, by dragging it. In case you know the exact place in which you
wish to place the Object, you can right click anywhere on the Object and access the Move dialog where
you can enter the exact X and Y coordinates.
Removing Objects
To remove a placed Object, select the Object and right click on it. A submenu will come up and
you need to click on ‘Delete’.
You can also remove a placed Object, by selecting it and clicking on the Delete key on your keyboard.
Resizing Objects
To Re-size an Object, you have to select it first. When you move the cursor over the corners or side
center points marked by black dots, it will change to a double sided arrow, that can be dragged to
increase or decrease the size arbitrarily. The status bar at the bottom will automatically update
the size as you keep fine tuning it.
Rotating Objects
Select the Object you wish to rotate. When you move the cursor over the corners marked by black dots,
it will change to a circular arrow that indicates that the object can be freely rotated.
In case you know the exact angle of rotation, you can right click anywhere on the Object and access the
“Rotate” window where you can enter the exact angle degree.
The program has been designed so that objects do not extend beyond the boundary line of the entity.
When an object is placed close to the side or the corner, at times there is insufficient space to allow
the rotation without crossing the boundary. In such cases, there is no response from the program when we
use the rotate cursor. For such cases, you should shift the object to the centere, rotate it to the
desired angle and then move it back to the desired position.
Placing an object over another object
An object can be placed over another object. To bring the object from back to front or vice versa,
you can select the object that needs to be shifted. Right click anywhere on the Object and access the
Bring to Front or Send to Back functionality.
Undo Redo Feature
The program supports the undo and redo feature from the Edit Menu. You can undo or redo your object placement and layout designing actions up to an unlimited number of times in one session. The Ctrl Z and Ctrl Y shortcuts can also be used to Undo and Redo respectively.
Object Send to Back and Bring to Front Feature
If 2 or more entities are overlapping then you can send one of the entity back or bring in front as per your choice by right clicking the object and choosing the appropriate option.
|